One area of our homes that seemingly always needs attention is the office (or the place where your papers, mail, and documents land).
Usually, I recommend digitizing and making your files electronic rather than cluttering the office with piles of paperwork. However, there are certain things that require a hard copy to be kept on hand. For those items, I like to recommend creating an “Important Documents” binder.
Things You’ll Need:

Brother label maker and paperwork filing supplies.
A sturdy binder. (I reccomend the easy-open kind, like this one. Usually 2 inch binder is fine)
Page protectors, any kind will do. (Here are some on Amazon)
Dividers (preferably with tabs like these, but pockets can be helpful too like these)
Optional— label maker for the tabs (Here’s our go-to label maker)
All the important documents you need to keep, but don’t access frequently.
The goal of this project is to create a system to neatly store all your documents while also having quick and easy access. One of the many benefits to this option is that the binder is portable, so if for some reason you needed to quickly grab the documents, like in case of a natural disaster or fire, you can grab them quickly without sorting through a large heavy filing cabinet.
Step 1: Create Some Categories
Using the labels on your dividers, list out the categories you will need. This can be done several ways— but I recommend one of two options: either categorize documents by family members or by type of document i.e. medical, occupation, financial, etc.
Personally, my binder has the following categories- Me, my husband, my (fur) kids, “joint” documents, and tax documentation.
I personally prefer the family member method best because I think it’s easier to to group documents without getting bogged down in numerous types of documents.
Step 2: Protect the documents
This part is pretty simple— put all the documents in page protectors. This allows you to put them in a binder without hole punching the document itself. It also allows you to see each document in its entirety at a glance rather that if it were in a filing cabinet and stored sideways.
Step 3: Assemble the Binder
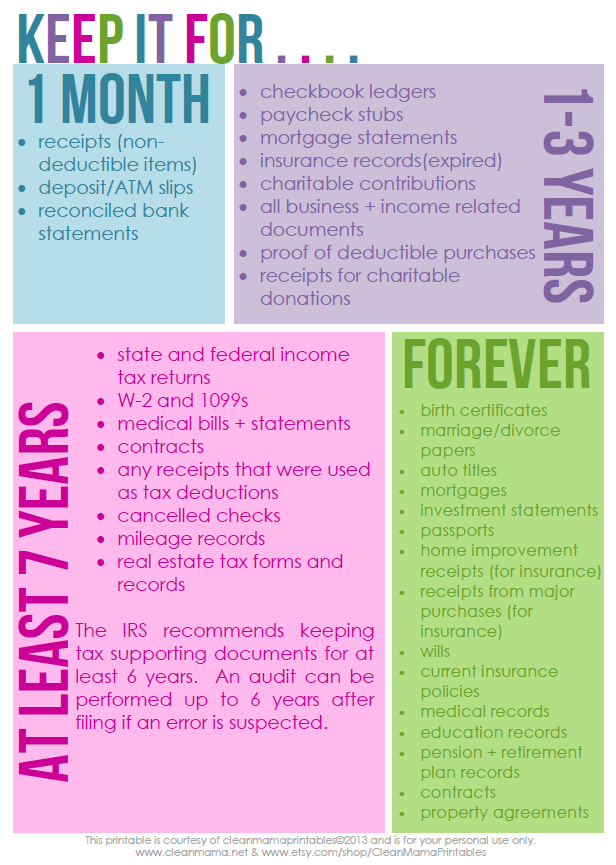
File the documents under the corresponding category. Keep in mind as your filing that you only want to save documents you truly need to store long-term. If you’re wondering how long to keep certain things, take a look at the reference below to help you make a decision on documents that could be iffy.
That’s it! You’re done and now you have an easy way to store and access paperwork.
A note on Categorizing:
Below, I’ve listed the categories I used and what documents I store to give you an idea of what this project could look like, but keep in mind this is to help YOU and YOUR home, so please do whatever works best for your home.
Me— Bank account information, transcripts for job applications, childhood vaccination records, birth certificate
Hubby- Birth certificate, transcripts, medical history, vaccine records, Military service records, certifications
Joint— Marriage certificate, title to our house, mortgage information, loan documentation, Insurance
Taxes— All W2s for last 7 years
Pets— Vaccination records, medical needs, micro-chip information
How long to hold onto documents
One last tip for this area is having a handle on the length of time to keep specific documents. I have found the guide below from Clean Mama to be extremely helpful as I sort through my own files.
I hope this helps you create a plan for how to tackle your paperwork at home. The beginning of a new year is a great time to get those papers stored in a neat and accessible way!
As always, if you’d like a bit of guidance or help getting your paperwork (mail, documents, work files, etc.) in order- our team is happy to help.